Basics of Room Setup
At GIK, we understand that jumping into the science of sound can be dark and scary. Or at the very least, can simply take up a lot of time rummaging through information to get at what you need. We’re here to guide you through the muck. This article aims to provide a general overview of room set up; particularly positioning your speakers, listening position, and acoustic treatments – be it acoustic panels, bass traps, or diffusors. Since we have articles on many of these concepts already on our site, links are provided throughout if you wish to read in-depth features on particular topics.
Positioning Your Setup
Getting set up properly in your room has a huge impact on the issues you’ll face in your room acoustically. Some acoustic issues in rooms are strictly due to positioning and can only be solved by setting up properly in the room. Moreover, finding the best speaker and listening positions in the room will help you get the most out of your equipment and acoustic treatment in the space.
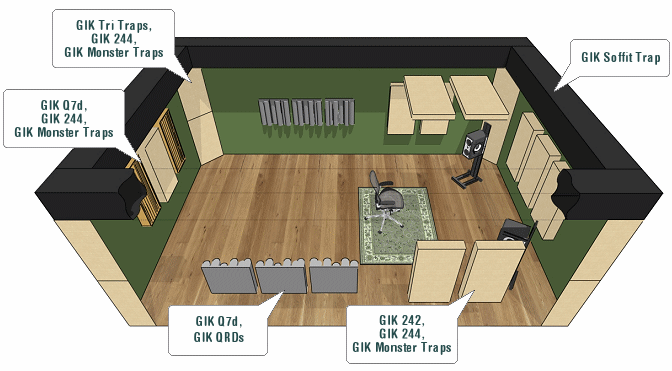
In most rooms, you’ll want to orient yourself so that you’re facing the shorter wall, with the longer walls on your sides. This orientation gives greater flexibility for positioning your speakers and listening position in the room, and also gets you farther from harsh rear wall reflections. It is also quite important to get centered in the room, for speakers and listening position. Check out our video, “Positioning the Listening Spot.”
It’s recommended that you should start experimenting with listening position set to about 35% – 40% of the way into the room from the front wall (or the same distance from the rear wall for a theater or some two channel rooms). This range avoids the biggest dips and peaks from room modes. You’ll definitely want to avoid being in the center of the length of the room, and you’ll want to avoid being closer than a few feet to any room boundary. You should also check out our “Room Setup General No-Nos” article for other problems to avoid, especially if you’ve got a home theater room.

Speaker positioning can be tricky business, and it can take a lot of trial and error. However there are some general guidelines that can help expedite the process. First and foremost you should check out our detailed “Monitor Positioning” article to get a good look at where to start. Keep in mind, you’ll usually always want the speakers to be equidistant from their respective sidewalls if possible – if your left speaker is three feet from the left wall, you’ll want your right speaker to be three feet from the right wall.
Many monitor manufacturers recommend keeping your monitors away from a wall if at all possible. However, this is not always the best piece of advice. In fact, in most small rooms, having the speakers right up against the wall is the absolute best position. In general you should avoid having your speakers anywhere from 12” to 30” from the front wall, unless you treat directly behind the speakers. Otherwise you can get cancellations and peaks in response due to reflections from the front wall. This phenomenon is known as Speaker Boundary Interference Response, or SBIR for short. You can read more up about SBIR here.
We typically recommend getting your speakers on dedicated stands as opposed to sitting on your desk. Having monitors on their own stands gives you more degrees of freedom in getting excellent speaker positioning, and also can help in decoupling the speakers from a resonating desk. However if the monitors do end up sitting on a desk or table, you’ll absolutely want to get them decoupled. We recommend the isoAcoustics desktop stands, as they’ve got a great R&D team and the stands have been tested extensively – exactly how we like to do business.
Early Reflections
 One of the first areas we always recommend treating in a room is the early (first) reflection points. First reflection points are the first points on your sidewalls, floor, and ceiling where reflections can bounce off and come back to listening position. These reflections are loud and quick, so they cause a lot of interference from low-mids to high frequencies and can give irregular spikes in response and smearing of dynamics. Luckily, reflection points are easy to treat with a few acoustic panels in the right spots. We’ve written an article about Early Reflection Points that you can read, and we’ve also got a video on how to find your First Reflection Points
Bass Issues
There are many different types of low frequency problems in rooms, but most boil down to dips in response (leading to a lack of low end) and peaks in response (leading to muddy / boomy sound), or a combination of the two. The largest contributor to bass unevenness in most rooms are the room modes, which cause standing waves. Appropriately dealing with bass can be difficult, which is why we’ve got a lot of material and multiple products
Late Reflections
Reverberation and flutter echo are the easiest problems to identify in any room, and are especially prevalent in rooms with a lot of empty wall spaces and hard surfaces. Treating both issues can be simple, however. Reverberation can simply be controlled by using appropriate acoustic panels more or less evenly spaced throughout the room, to get general dampening. However, reverberation can also be dealt with by diffusion, which will help turn the excess decay into a more controlled ambiance instead of removing the sound energy. Flutter echo specifically happens between any two flat, parallel walls, and is usually found in the upper half of most rooms since the sound isn’t broken up by desks, chairs, amps, etc. up there, and can be treated using either absorption or diffusion. As was mentioned with reverberation, using diffusion is sometimes preferable if control is wanted but dampening is not. For more on diffusion, check out our video “How Diffusion Works.”
A New Foundation
It is important to have a strong foundation to build on in any room. If the set up in the room is less than optimal, results won’t be as expected and problems can arise. On the other hand if the general guidelines above are met and understood, then identifying secondary problems and solutions will be much less challenging and costly. Of course, in practice, some of these suggestions are not possible to apply in all rooms. When there’s a door to your left, or your rear wall is angled, questions arise. Luckily, we’re here to help.


Share:
The GIK Acoustics Difference
How-To Acoustics: Guide to Reduce Noise or Soundproof an Office